
Unlock the magic of decoupage with our easy guide! Learn how to decoupage to transform items effortlessly. Dive into DIY decor with step-by-step tips. Start crafting your story now!
Breath new life into a whole range of items from old furniture, to a wood box, to a glass vase, to a coffee tin with the art of decoupage. You can use a variety of materials including paper napkins, tissue paper, book pages, and sheet music. Thin paper is suitable for many projects, with thicker paper suitable for flat surfaces.


My recent decoupage projects have all been made with papers I have printed myself with a gelli plate. If you are not familiar with gelli plate printing its super easy to do at home, check out my How to Gelli Plate Print.
Table of Contents
The History of Decoupage
Decoupage traces its origins to ancient civilizations, with the word “decoupage” itself being a French term meaning “cutting out.” This craft gained popularity during the Renaissance and has evolved over the centuries. It’s a versatile art form that can be applied to various surfaces, including wood, glass, metal, and even fabric.
In the 18th century, decoupage became a beloved pastime among ladies of leisure. They used it to adorn everything from furniture and household items to personal accessories, giving birth to a new art form that combines the skills of cutting and pasting with artistic creativity.
Materials and Tools for Decoupage
Before you begin your decoupage project, you’ll need to gather some essential materials and tools. Here’s a list of the basics:
- Base Object: Choose the object you want to decorate. It could be a furniture piece, wooden box, a glass jar, a piece of furniture, or any other item you wish to transform.
- Decoupage Paper: This is the heart of the craft. You can use specialized decoupage paper, printed napkins, or even thin wrapping paper with appealing designs. I am working with gelli plate prints on tissue paper and parchment paper.
- Decoupage Medium: This adhesive is essential for securing the paper to your chosen surface and creating a smooth finish. You can use PVA glue or mod podge, which is a popular choice among crafters. The glue must be suitable for the paper material and chosen object.
- Foam Brush: A foam brush is a great way to apply an even layer of your chosen adhesive.
- Scissors: A good pair of scissors is crucial for cutting out your chosen designs precisely.
- Sealer/Finish: Once your decoupage project is complete, use a clear sealer or finish to protect it and give it a polished look. I am using moid podge to seal my projects which dries matt and clear.
- Damp Cloth: To clear up any spillages or excess adhesive


How to Decoupage
Decoupage is a straightforward yet satisfying and absorbing process that involves several steps:
Prepare the Base: Start by ensuring your project surface is clean and dry. If you are working with a wooden object you may wish to sand with a grit sandpaper and prime the surface.


Cut and Arrange: Cut out your chosen decoupage paper designs, arranging them on the object to create a layout you’re happy with.


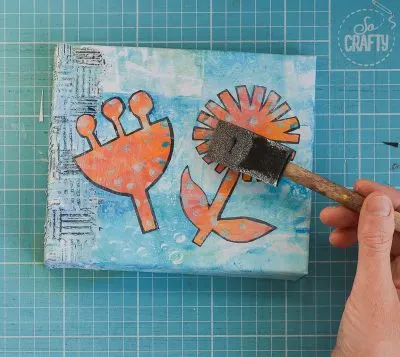
Glue and Smooth: Apply a thin layer of adhesive to the base or the back of your paper cutouts. Carefully place the paper on the base and smooth out any air bubbles or wrinkles with a brush or your fingers. You can even use a credit card edge to smooth wrinkles.


Layering: Repeat the process for additional layers if needed, for the best results allow each layer to dry before adding the next. Layering can create a rich, textured effect.


Sealing: Once you’re satisfied with your design and the layers are dry, apply a sealing top coat of decoupage medium or clear sealer to protect your work and give it a protected finish. For additional protection apply a second top layer.

Tips for Successful Decoupage
To ensure your decoupage projects turn out beautifully, consider these tips:
- Start Simple: If you’re new to decoupage, begin with uncomplicated small projects to practice your skills.
- Choose Quality Materials: High-quality decoupage paper and medium can make a significant difference in the final result.
- Curved Objects: Smaller pieces of decoupage are easier to manage on a curved object. With items that have straight flat edges, you can use larger pieces of material.
- Experiment with Layering: Don’t be afraid to layer papers, as this can add depth and complexity to your design.
- Be Patient: Allow each layer of decoupage medium to dry thoroughly before applying the next. Rushing can lead to wrinkles and imperfections.
- Precision: Take your time when cutting out designs to ensure clean, neat edges.
- Protect Your Work Area: Cover your workspace with newspaper or plastic to catch any glue drips or spills.
- Embrace Imperfections: Decoupage can be forgiving. Small imperfections can add character to your piece.


Design Choices for Decoupage
Let me share with you very different styles of decoupage all made with gelli plate prints. I know I always find it helpful to see finished examples, I have tried to be wide and varied in these projects to show you the potential of decoupage.
Pen Pots
The first is bright and colorful on a straight object. A bank card proved very helpful for smoothing out the wrinkles. The design was applied as one flat piece of paper cut to the size of the coffee pot.


The gelli plate print was made with a design drawn in a thick black posca pen, followed by applying a layer of blue paint through a stencil.
Once this was fully dry a third layer was added to the Gelli plate of magnet acrylic, and stencils were placed on and removed to add pattern to this color, before applying a 90gm piece of paper to take the print in one go.
Vases
These were found in charity shops (thrift shops to my American friends). For this decoupage project I worked with ripped up gelli plate prints on parchment paper.


The gelli plate print was made by layering paint, first layer of acrylic paint was applied and sprayed with water and allowed to fully dry. The water repels the acrylic paint in patches. For the second layer repeat the process and allow to fully dry.
The third and final layer of paint is applied, then immediately place your paper over the print and brayer rolled over the top to ensure it has made good contact with the gelli plate. Then be patient – wait until it has fully dried, overnight is best, before pulling the print.
Wooden Box
This cute box was also found in a charity shop (thrift shops to my American friends), it is a former musical box. For this decoupage project, I worked with sheets of printed tissue paper cut to size for the box.


The gelli plate print was made by applying one layer of acrylic paint to the gelli plate, crumpling up the tissue paper and then unfolding and applying to the plate. Lift the print – you will see that you have a lovely patterned print caused by the wrinkles in the paper. I repeated the process with a second color.
To see how to apply flecks of gold leaf check out my gelli printed decoupaged bracelets.
Frequently Asked Questions for How to Decoupage
Can you decoupage with PVA glue?
Absolutely!! It’s usually fine to use PVA glue for decoupage (mod podge is similar in its formula). Note that some PVA glues can be very quick-drying, watery or thick!
Can you decoupage straight onto wood?
Yes, but you may wish to prepare the wood with a light sand first, this will depend on the surface of the wood and how uneven it is.
How many layers of Mod Podge do I need for decoupage?
This really depends on how smooth a finish you would like on your finished project. The more layers the smoother it is.
What can I do about air bubbles?
Dont panic!! Smooth out your paper as you glue. If you have air bubbles remaining once the glue has become tacky you can pop the bubble with a pin, apply more glue, and smooth out. It is worth noting that air bubbles are more frequent with larger pieces of paper.
Decoupage is a delightful and accessible art form that allows you to transform ordinary objects into extraordinary creations. Whether you’re an experienced crafter or a complete beginner, the art of decoupage offers endless possibilities for creativity and self-expression.
If you are inspired by gelli printing check out my 25 great projects for gelli prints.

